


The Lunchbox #11
“Heaven knows, a civilized life is impossible without salt.”


What I’m currently consuming
The Sauce: Nonya’s Secrets

These sauces are a game-changer for those who love the authentic, complex flavours of Malaysian and Chinese cooking, but don’t have the to invest in making it from scratch. These sauces, “recipes handed down from my Peranakan heritage, a fusion of Chinese and Malay culture” are created by ex-restauranteur, Maureen Suan Neo. They are the recipes she used to serve in her popular London restaurants and you can tell; they have layer upon layer of flavour, with a freshness and vibrancy uncharacteristic of anything you usually find in a jar - and none of the chemicals usually employed to extend shelf-life.
They have 10 different products, all with their own identity. The spicy peanut sauce makes a thrilling curry, deep, warm and aromatic while the sambal curry mix delivers all the funk and spice you could wish for. Grab your chicken/pork/prawns/tofu/vegetables and get yourself a jar, I promise that meal times will never be the same again.
The Documentary: Jiro Dreams of Sushi
I’m a little late to this party, but Amazon Prime have just added this lushly-captured documentary and it’s a must-watch. Jiro Ono is an 85 year-old sushi chef, working day in, day out in his tiny 10-seat restaurant located in a very inauspicious spot in a Tokyo subway station. Despite the odds, it garnered three Michelin stars and has become a temple of sushi, with people paying £350 a head and booking months in advance in order to take a coveted seat at his sushi bar. This is an elegant meditation on the role of work, family, and the art of perfection, looking at Jiro’s as both a unique success in the culinary world and a loving, yet complicated father.
Meet the Maker: Sew Bella

It’s hard not to smile when you see Bella Bowker’s work. She takes everyday items such as napkins, white t-shirts and aprons and brings life to them with her characteristic witty, food-punny embroidery. Her speciality has to be the teeny-tiny food item (just look at the scales on the fish!), but this lady can turn her hand at anything and is in high demand to collaborate with brands. I asked her how she found her way to this niche.
“In my first year at uni, I had a rather unfortunate accident on the mountains that left me sofa bound for four months. I decided to take up a new hobby, and after trying my hand at knitting and tapestry - I found embroidery. Over the next six years, I dabbled, just gifting to friends until 2020, when Sew Bella had gained enough traction for me to leave my job and give it my absolute all.
My biggest challenge was Sew Bella’s first Christmas. In a desperate attempt to prove the decision I’d made was the right one, I took on way too many orders, with no time to do them and ended up stitching for about 20 hours a day. There were some breakdowns, there were some tears, but ultimately, I made it through and learnt a valuable lesson.
I’m most proud of my biggest commission to date, which was working with Selfridges, on a 3m x 3m hand-embroidered tapestry, which is now hanging (see above) at the entrance of the London food hall for the festive period. After many hours of stitching, it was an amazing moment to see it in all its glory in one of London’s most iconic shops. Pretty cool.
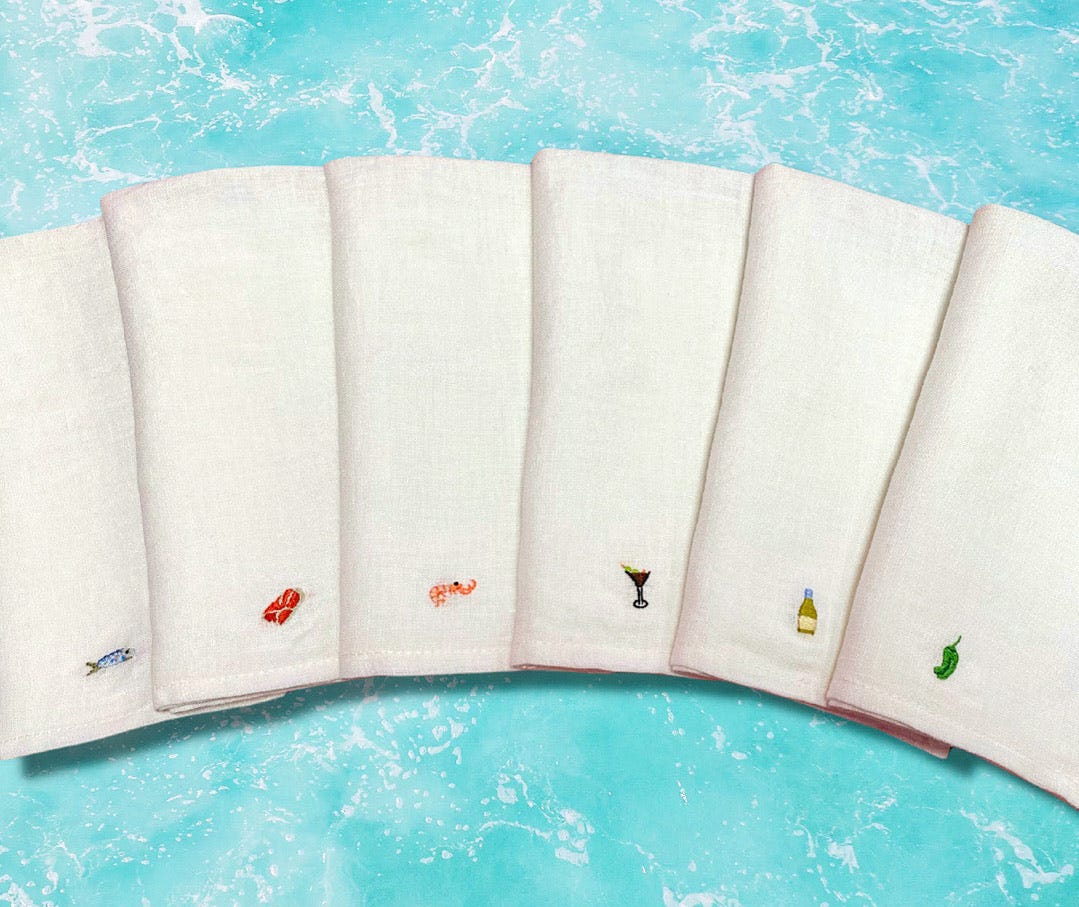
Bella’s work makes the most wonderful presents (the One Oeuf is Enough T-shirt, please!). Have a look at her website and see what tickles you. As mentioned, she does personalised ‘Favourite Things’ linen napkin sets embroidered with you or your giftee’s favourite things - can you think of a better Christmas gift?

Something to fill you up
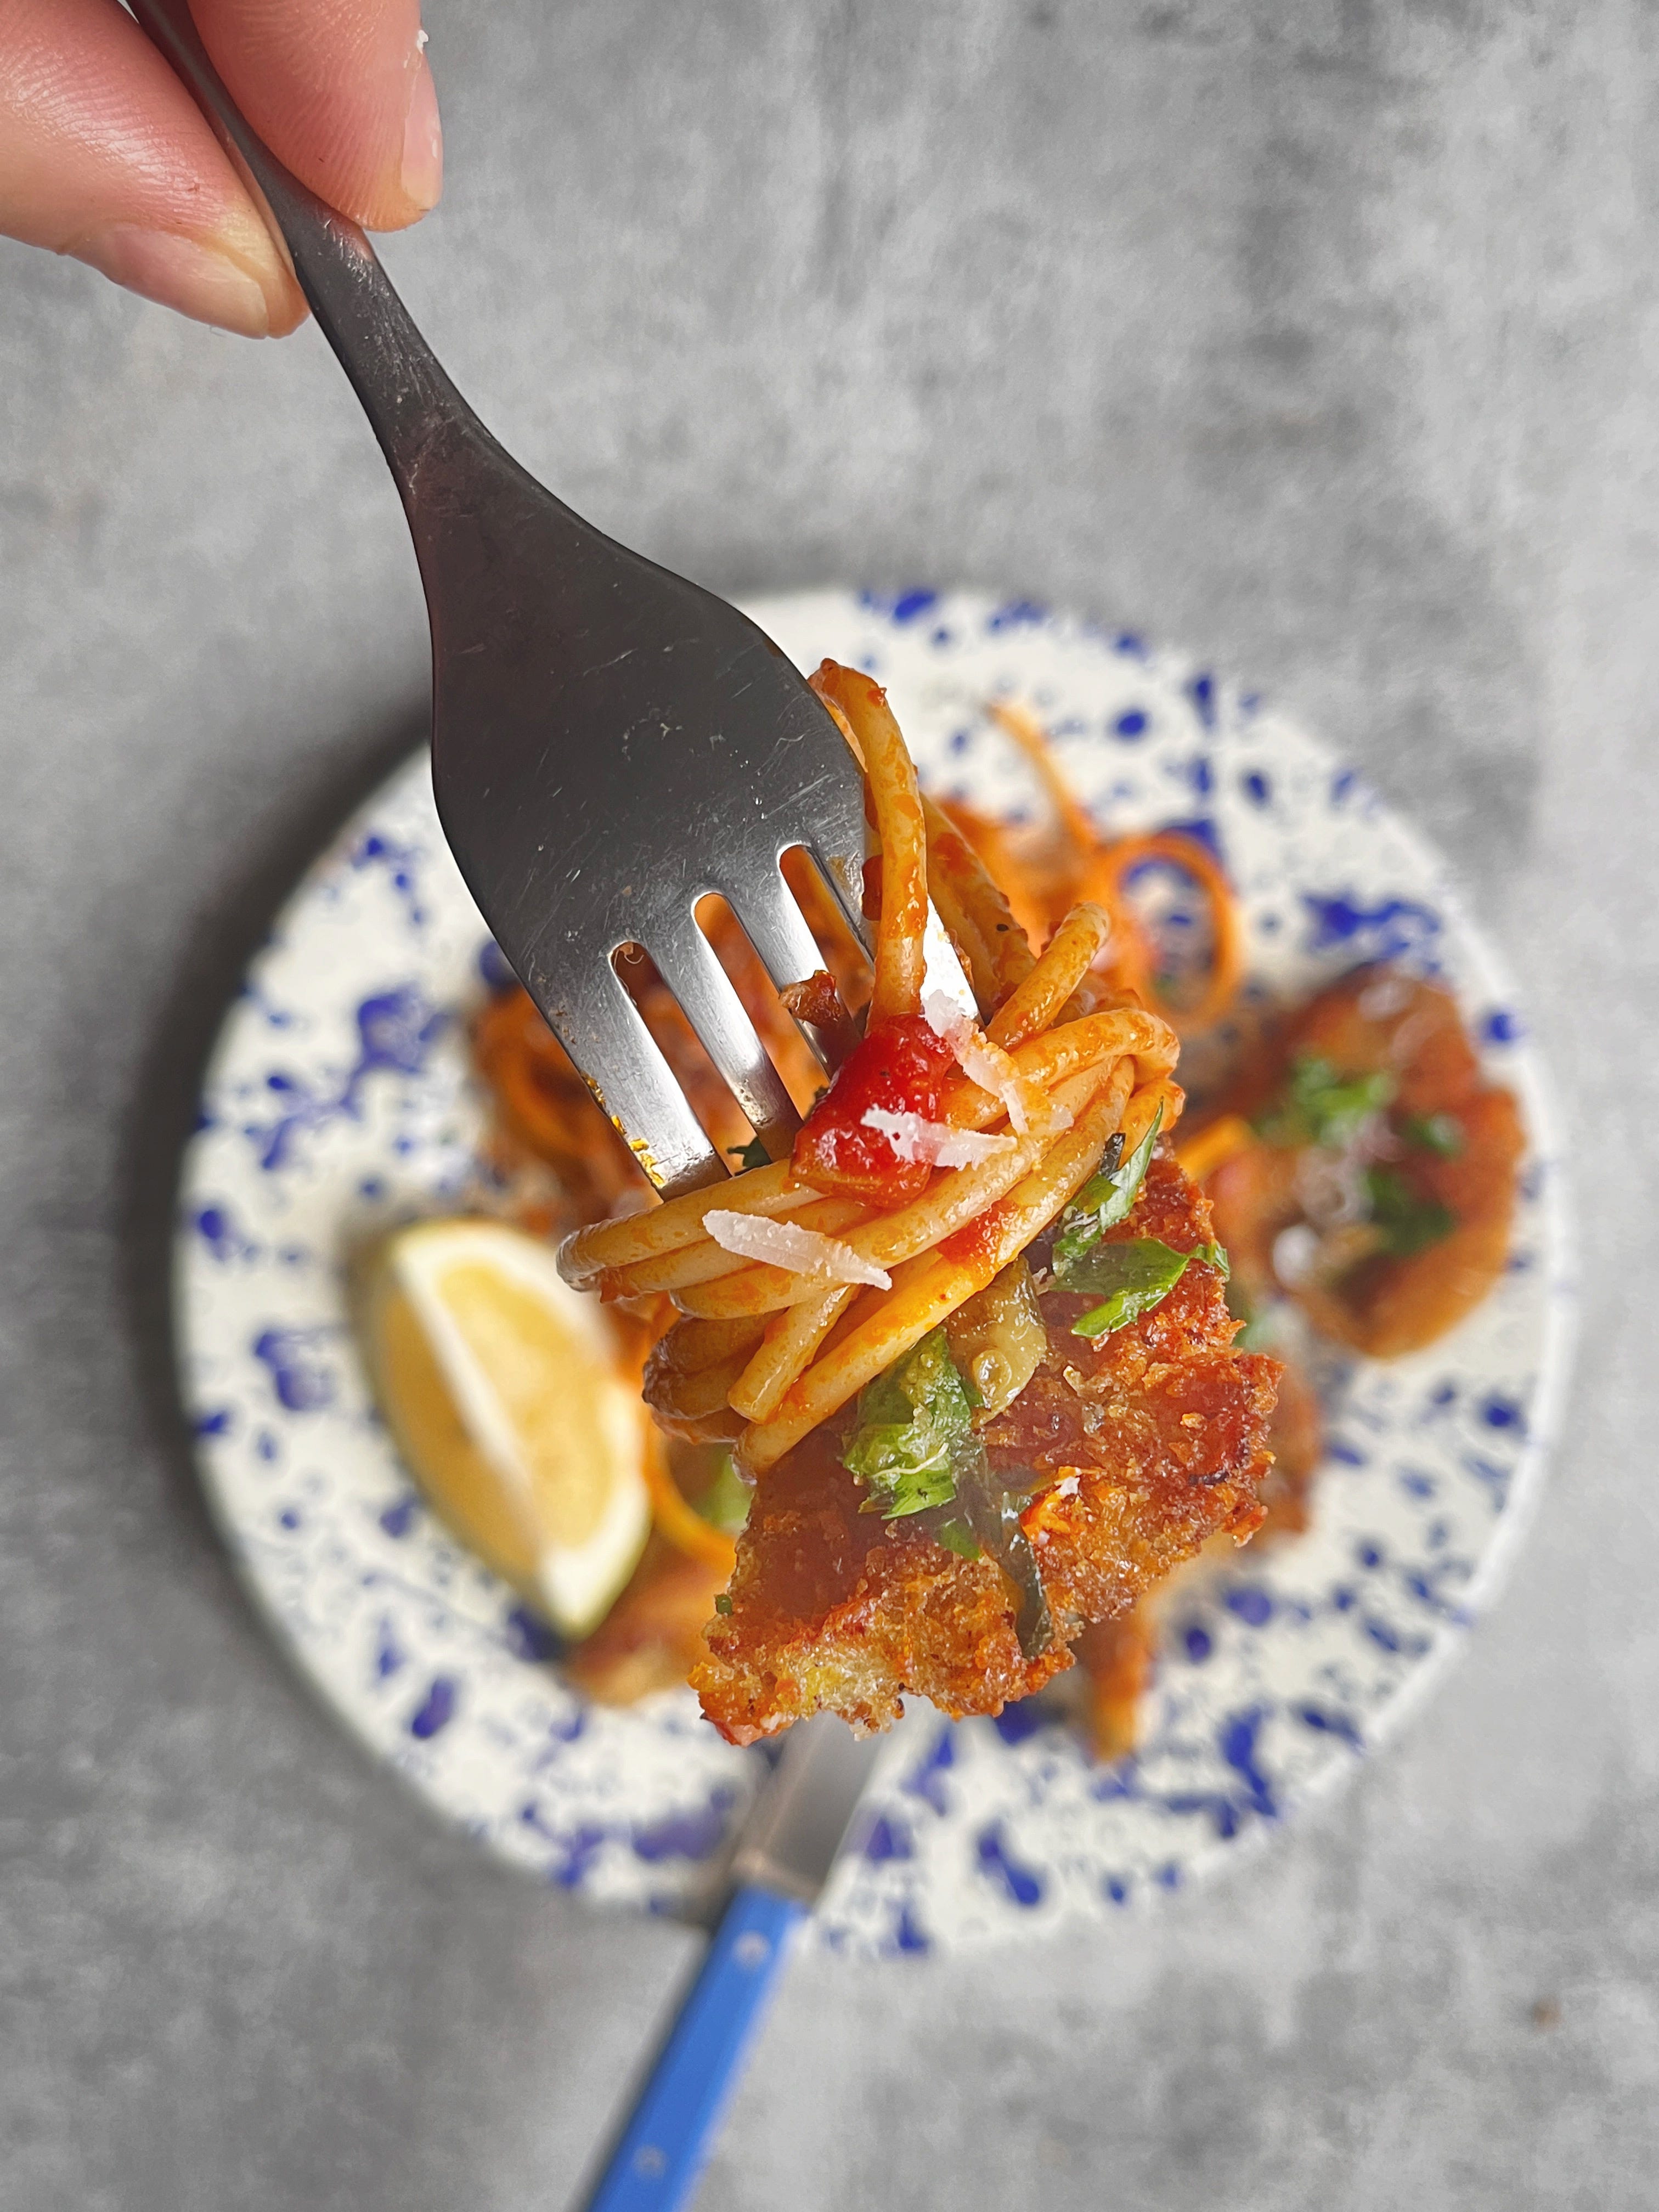
Oyster Mushroom Milanese
This is a veggie take on my absolutely favourite Italian-American dinner. If you’re trying to eat more veg, less meat… this is your answer. These mushrooms are as meaty as veg gets and full of protein. As you can imagine, this is dish is a flavour/texture mouth bomb; crispy breaded mushrooms with a luxurious, classic tomato spaghetti.
I’ve also thrown in a Schnitzel (veal Milanese’s Austrian cousin) twist by adding a ‘Holstein’ sauce of perky capers, parsley and lemon.
Make this vegan by dipping the mushrooms in aquafaba (the liquid from tinned beans/chickpeas) and fry in oil. I like to get my pasta partially cooked so I can enjoy the mushrooms straight out the pan.
Watch my how-to video here

Serves 4
3 tbsp plain flour, seasoned generously
100g panko breadcrumbs (or other breadcrumbs)
2 eggs, beaten
A splash of milk
250g oyster mushrooms, left whole
2 tbsp olive oil
60g butter
1 heaped tbsp capers
A small handful of parsley, chopped
Juice of ½ small lemon
For the spaghetti
4 tbsp olive oil
3 big garlic cloves, sliced
2 x 400g tins chopped tomatoes
400g spaghetti
Parmesan, to serve
Make the pasta sauce first. Warm the olive in a deep saucepan over a medium-low heat and gently fry the garlic until it begins to colour on the edges. Add the tomatoes and plenty of seasoning and leave to simmer for at least 30 minutes until reduced and delicious while you get on with everything else. Add splashes of water if it looks like it’s drying out.
Bring a pan of salted water to the boil and cook the pasta to 2 minutes away from al dente, then drain, keeping 2 cups of cooking liquid and rinse in a sieve under cold water until cool. Put to one side.
Place the flour and breadcrumbs on separate plates, and whisk together the milk and eggs in a separate wide bowl.
Coat the mushrooms in flour, then egg mixture, then dredge in the crumbs. Heat the oil and half the butter (the oil prevents the butter from burning) in a heavy, wide frying pan over medium-high heat. Once the butter and oil are sizzling, add as many mushrooms as you can fit without crowding them, turning, until golden and crisp, around 4 to 5 minutes. Transfer to a kitchen paper-lined plate and repeat with the remaining mushrooms, keeping any cooked ones in a low oven if you like.
Add at least half a cup of the pasta cooking water to the tomato sauce and bring to a simmer. Add the partially-cooked pasta, stirring until it has warmed up and is absorbing the sauce. Add more pasta liquid as needed. Allow to simmer for a moment until it’s looking delicious.
Transfer to plates and sit the cooked mushrooms next to it. Quickly return the frying pan to heat and wipe clean of any breadcrumbs. Add the remaining butter and cook, swirling, until brown and nutty, about 20 seconds. Stir in the capers, parsley and lemon juice and then immediately spoon over mushrooms. Grate over Parmesan, and serve.

Something to finish you off
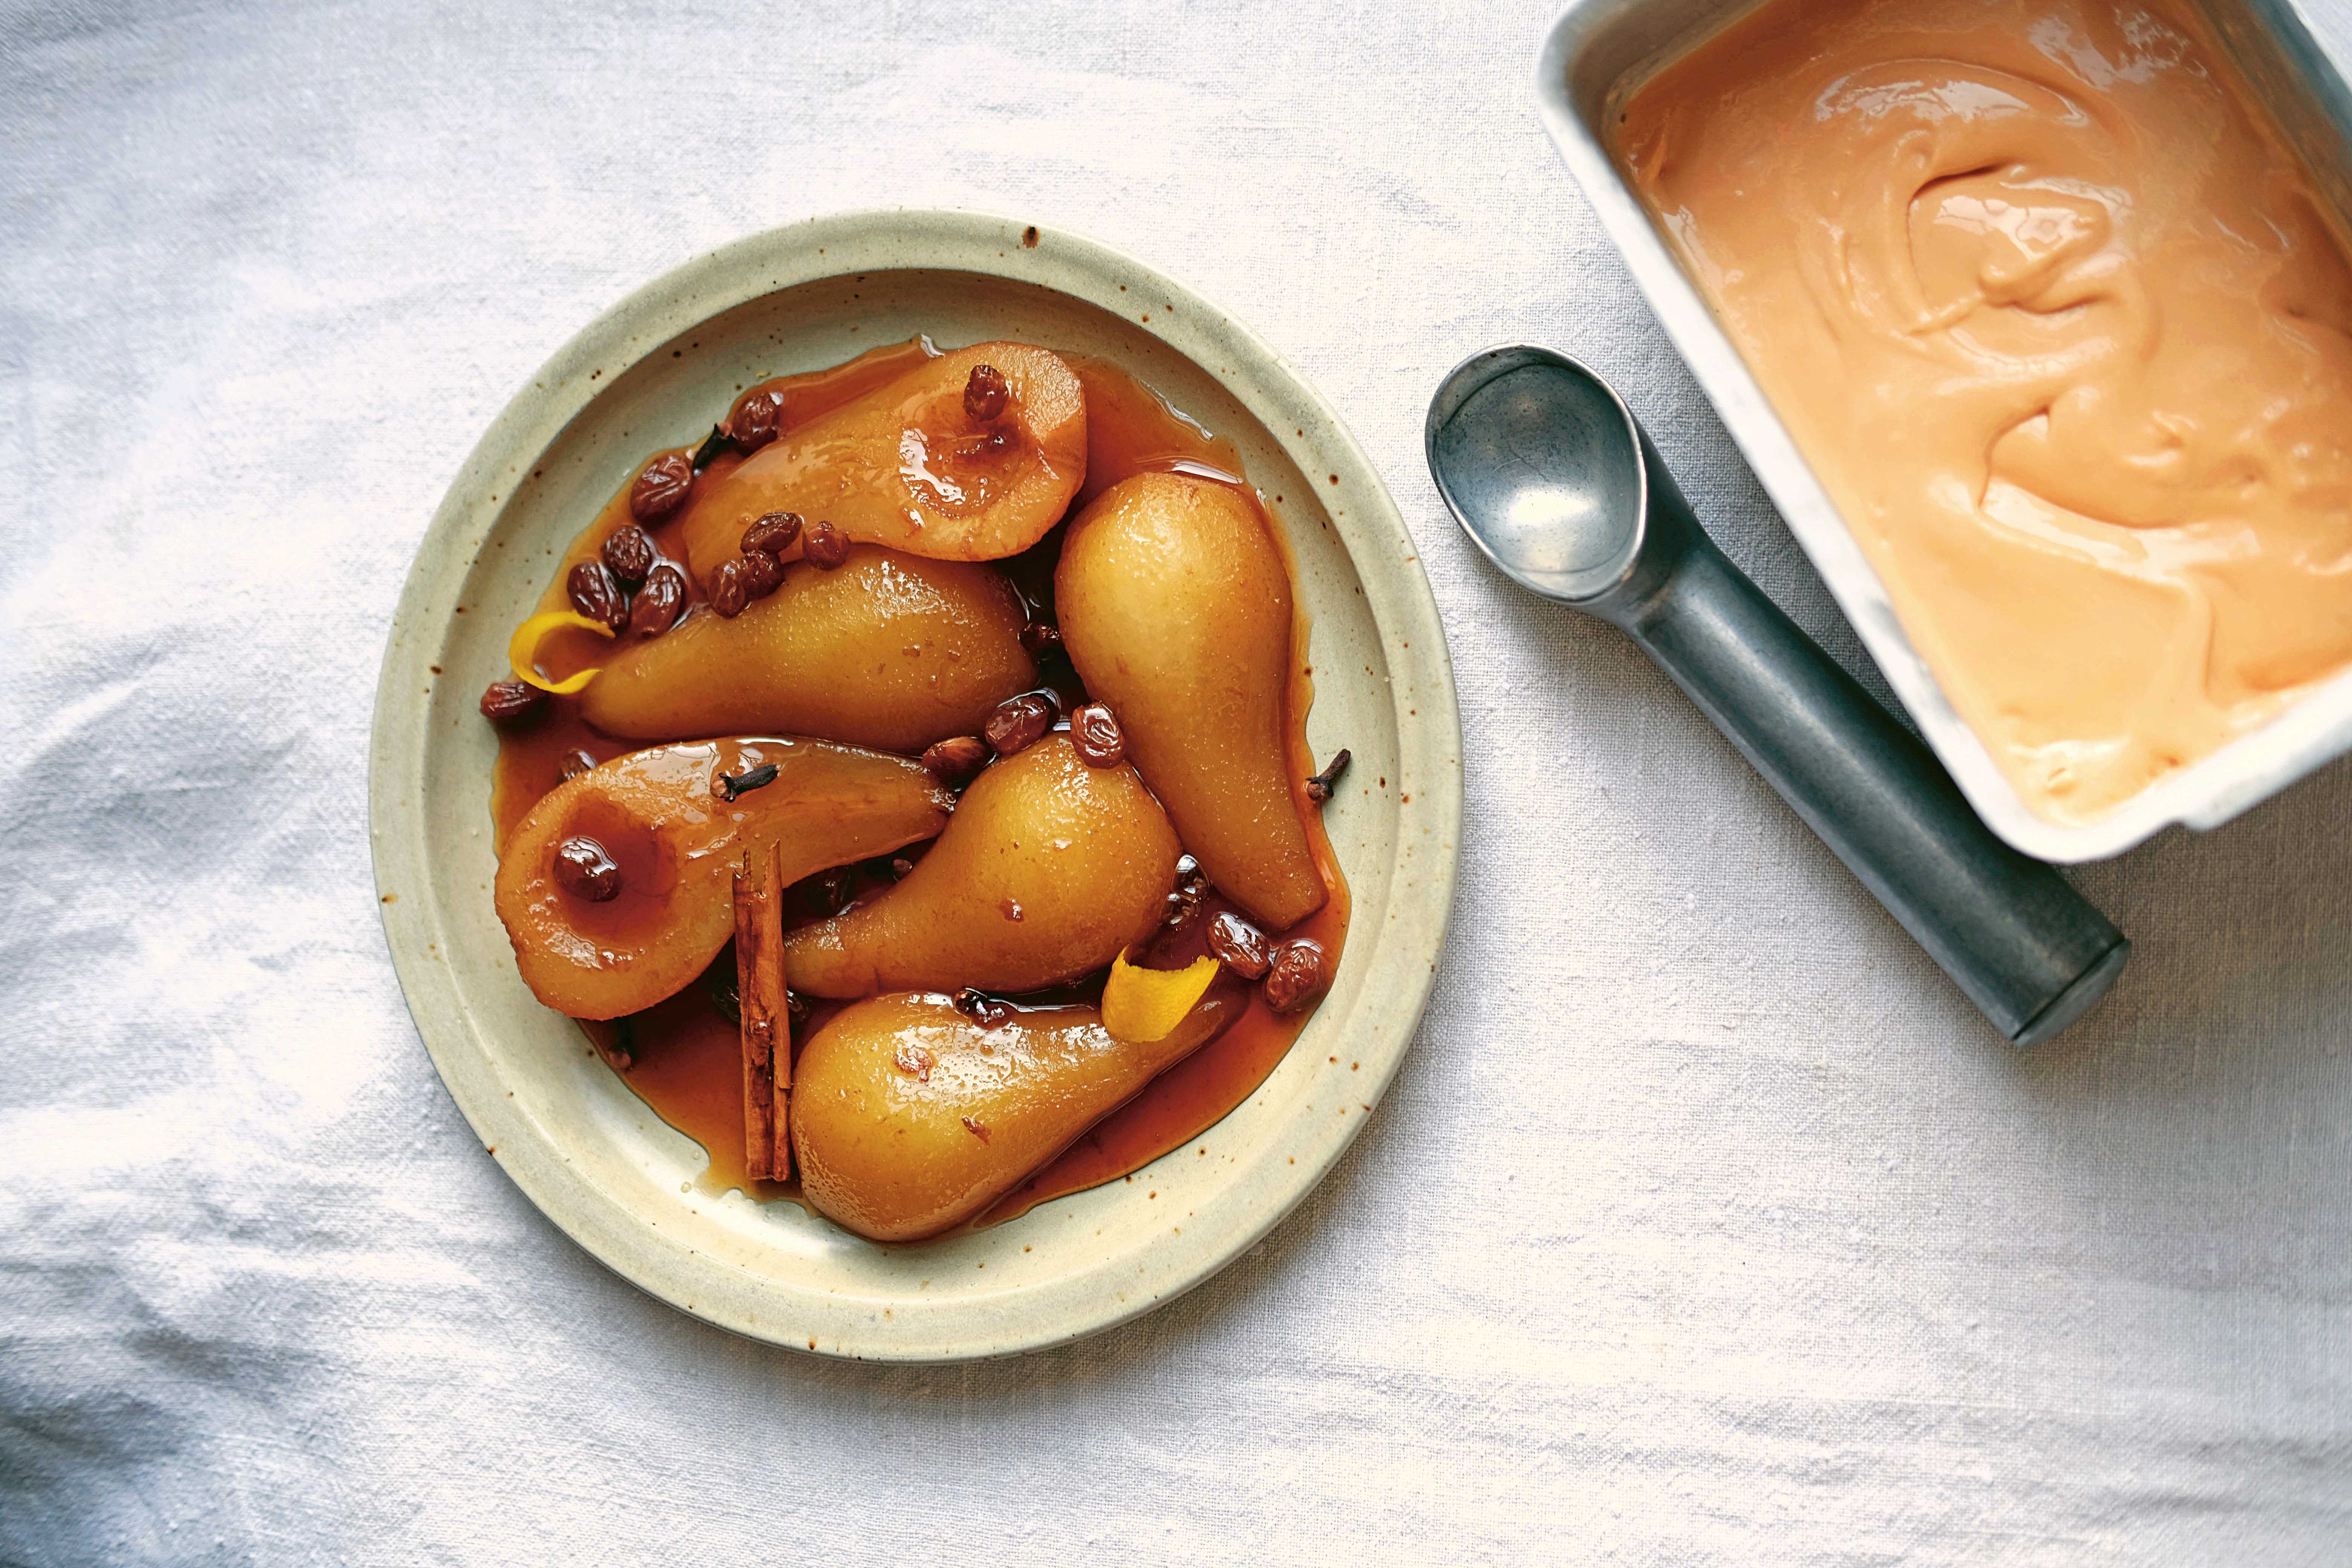
We are right in the middle of pear season and nothing brings out its distinctive, fragrant sweetness better than poaching. The wonderful Olivia Cavalli has just brought out her beautiful seasonal Italian cookbook Stagioni, and this elegant, understated recipe caught my attention immediately. Olivia has a natural, laid-back Italian style of cooking and this recipe perfectly exemplifies that. So to celebrate pear season and her glorious book, here is her recipe for Spiced Pears and Zabaglione Ice Cream.
Pere con Gelato di Zabaglione
Zabaglione is a whipped, light-as-air, boozy, eggy custard that comes in many forms. The original ice cream recipe is from an old Carluccio book. Once, on halving the recipe, I forgot to halve the marsala. What it gave me was this: a semifreddo of sorts that never freezes solid, rather it stays soft and scoopable, almost sticky, melt-in-the-mouth, rich and heady with alcohol. Just the ticket at Christmas, served alongside (more) marsala poached pears. Get ready for a long nap afterwards.
Serves 6–8
For the ice cream
8 egg yolks
125g/4½oz caster sugar
180ml/6fl oz marsala
220ml/8fl oz double cream
For the pears
4 medium pears, approx. 150g
450ml/16fl oz sweet marsala
60g/2¼oz caster sugar
3 tbsp raisins (optional)
Additional flavours (optional)
Rind of ½ a lemon
1 cinnamon stick
a few cloves
a few star anise
To make the ice cream, put the yolks and sugar in a large heatproof bowl and use an electric whisk to beat them until light, thick and voluminous. Pour a few inches of water into a small-medium saucepan and set the bowl on top, making sure that the base of the bowl isn’t touching the water, to make a Bain Marie. Turn the heat up until the water bubbles gently and continue to whisk the yolk mixture for a few minutes until thick, creamy and homogeneous. Be careful not to let it overheat or the egg will start to scramble. Remove the bowl from the heat and leave to cool. Once cool, fold through the marsala.
Meanwhile, in a separate bowl and with clean beaters, whip the cream to soft peaks with a pinch of salt. Fold the cream into the egg mixture bit by bit until just combined. Pour the mixture into your ice cream machine and churn according to the manufacturer’s instructions. If you’re not using a machine, pour the mixture into a large, shallow container and put in the freezer. Whisk with a fork every hour, 4–5 times before leaving to freeze fully. Peel the pears and slice in half lengthways. Scoop out the core. Set aside.
Put the sweet marsala and sugar in a large saucepan and bring to the boil for 2–3 minutes to allow the sugar to dissolve. Turn the heat down to a medium simmer then place the pears in the marsala, cut side down, so that they are in one single layer. Add the raisins, if using, and any additional flavours, along with a pinch of fine salt and 250ml/9fl oz water. Make a cartouche from baking paper to act as a lid by cutting out a circle the same size as your pan and making a small hole in the middle. Place the cartouche on top of the pears so that it touches them. Leave to simmer for around 1 hour, checking on them every so often. Scoop the pears and raisins from the liquid into a shallow dish. Turn the heat up and let the liquid bubble for 2–3 minutes, letting it reduce by about a third to a syrup. Pour the syrup over the pears. You can serve them right away or leave to cool and refrigerate until ready to eat – they keep for a good few days.
Serve scoops of ice cream with the pears and their syrup drizzled on top.
Extracted from: Stagioni: Contemporary Italian Cooking to Celebrate the Seasons by Olivia Cavalli (Pavilion, HarperCollins Publishers). Image credit - by Sophie Davidson

In praise of SALT: 10 nice things about it

🧂 Don’t be afraid of salt. Be more afraid of eating bland food 🧂
1. Salt is the ultimate wingman: it doesn’t try to add flavour of its own so much as bring out the desirable flavours in other foods. It suppresses bitterness and enhances sweet, sour and umami.
2. It brings six things to the party (and that’s why it should always be invited): it acts as a preservative, provides texture, enhances the flavour, is a source of nutrients, acts as a binder, and a colour enhancer. AND HOW ABOUT THAT, SUGAR?!
3. If there’s one thing professional chefs all agree on, it’s salt. It’s a magic bullet. Food needs it to be delicious. If your dish is just bit boring, 9 times out of 10 you’ve been stingy on the salt.
4. a) Salt early and frequently, and you’ll use less in the end. Get it in there from the beginning with your onions, rice, pasta water (and controversially, pulses, see below) and you’ll find it distributes better and you ultimately use less. It also takes a while to draw flavours out of food so simply adding it at the end often makes food taste salty.
b) A note on onions: salt also draws out liquid so is great for when you’re frying your soffrito (onion, celery, garlic, carrot) and don’t want colour on it as it steam-fries rather than just fry-fries, which can often caramelise and stick to the pan. If caramelisation/colour is what you’d like, salt at end.
c) A note on salting your pasta, potato or vegetable water: the key here is to make your water taste tasty. So not bland, not salty, but delicious-tasting water. If you’re not sure what I mean, just keep adding small amounts of salt and keep tasting and you soon will!
5. It’s an old wives tale about salt making your pulses tough and increasing the cooking time. Add from the beginning, it’s fine! You get a beautifully seasoned bean and need to add less at end. These guys agree.
6. When is the best time to salt your steak? According to Serious Eats, there’s a very specific window:
“If you've got the time, salt your meat for at least 40 minutes and up to overnight before cooking. If you haven't got 40 minutes, it's better to season immediately before cooking. Cooking the steak anywhere between three and 40 minutes after salting is the worst way to do it.”
This is because the salt draws moisture which is re-absorbed after 40 minutes creating a more seasoned, tender steak. But less than 40 minutes, you run the risk of the liquid still sitting on the surface and steaming rather than searing your steak.
7. “Take with a grain of salt”; an English idiom that suggests to view something, specifically claims, that may be misleading or unverified, with skepticism or to not interpret something literally.
Origins for the phrase are believed to come from our mate Pliny the Elder (owner of the title quote). In his work, Naturalis Historia, he talks about the discovery of a recipe for an antidote to a poison. In the antidote, Pliny says one of the ingredients was a grain of salt to be taken alongside the antidote. So threats involving the poison were to be taken "with a grain of salt", and therefore less seriously.
8. Things that are surprisingly improved with a pinch of salt: porridge, all sweet baked things (it balances the sweet and helps improve texture), margaritas, tomatoes, fruit - particularly melons.
9. What is kosher salt and why do I always hear about it in recipes? This is an American term referring to the large-crystalled, soft, no-iodine salt traditionally used by Jewish butcher to ritually cleanse meat and make it kosher.
10. When should you use flakes and when should you use table salt? Table salt has much smaller crystals than the flakes, meaning it doesn’t stick as efficiently and can easily bounce and fall between the cracks. Whereas flakes are larger and softer and tend to melt on contact so you get even distribution and therefore need less. Table salt is best for seasoning your boiling water or in hot dishes where it can easily dissolve, and flakes are best for most other purposes. Table salt often has added Iodine (a good thing) and anti-caking agent (a good thing to prevent clumping, but bad thing if you’re making pickles with it).